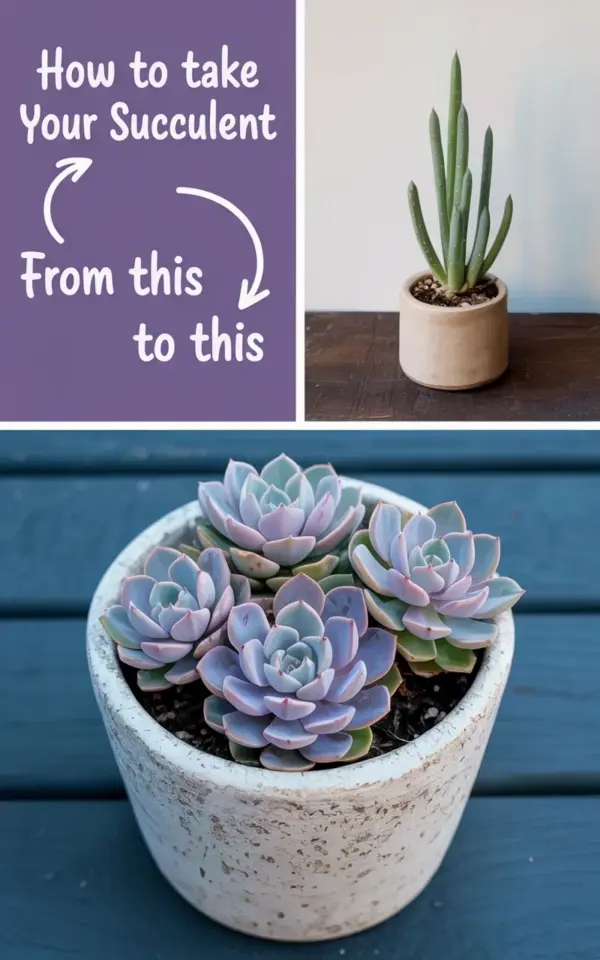
It’s January, which means every windowsill in my house is currently a tiny, slightly chaotic propagation station. I have pickle jars, a cracked cereal bowl, and one very fancy ceramic propagation tray that cost more than my last haircut. But right now, my favorite experiment is the exact one from that photo everyone keeps saving on Pinterest. You know the one: the purple background, the white text, a single awkward, stretching succulent in a little beige pot on top, and a dense cluster of purple-tinged rosettes sitting pretty in gray ceramic on the bottom.
Succulent propagation is honestly the most forgiving indoor plant project you can start this season. It takes a plant that looks a little sad, a little leggy, maybe a bit forgotten, and turns it into a full, lush pot of new growth. The best part? You don’t need a greenhouse, a grow light setup, or a botany degree. You just need a pair of scissors, a pot, and the patience to let nature do its weird, wonderful thing.
Why Your Succulent Suddenly Looks Like a Tall, Bald Stem
Look, that single tall stem in the beige pot is not ugly. It’s just a succulent that got a little too ambitious. When indoor plants don’t get enough sunlight, they stretch toward the window like a kid reaching for a cookie jar. This process is called etiolation, and it leaves you with a bare stem and a sad little rosette perched on top like a lollipop.
I’ve been there. I bought a gorgeous Echeveria in the spring, placed it on a bookshelf that I swore was “bright enough,” and by December it looked like a palm tree in miniature. The leaves were spaced out, the stem was weak, and honestly, it looked like it was trying to escape the pot.
Here’s the thing: that stretched stem is actually your golden ticket. Instead of tossing it, you’re going to chop it, replant it, and turn one awkward plant into a whole family. This is the classic “from this to this” transformation, and it works almost every single time. It’s a trick that works for nearly every type of rosette-forming succulent, from Echeveria to Graptopetalum to Pachyphytum.
How to Propagate a Stretched Succulent Stem (The Chop and Plant Method)
Ok, so you have your leggy stem. Grab a clean, sharp knife or a pair of pruning shears. Sterilize the blade with rubbing alcohol first, because you don’t want to introduce any bacteria to the fresh cut. You’re going to make a clean cut straight through the stem, leaving about an inch of bare stem below the rosette.
Remove the lower leaves from that stem section, leaving you with a bare stump and a pretty rosette on top. Don’t throw those leaves away! You’ll set them aside on a paper towel for a totally separate propagation project. I just did this last week with a purple succulent that was reaching for my grow light, and I ended up with six perfect little leaves to start fresh.
Now, here’s the golden rule: do not plant the cutting immediately. I know you want to. I always want to. But you have to let the cut end callus over for at least two or three days. Place the rosette on a dry paper towel out of direct sunlight. If you stick it in soil right away, it’ll absorb too much moisture and rot before it ever grows roots. Patience here is the entire game.
The Best Potting Mix and Containers for New Succulent Rosettes
When you’re ready to plant, forget the standard bag of potting soil. Regular houseplant soil holds way too much water for succulents. You need a mix that drains like a sieve. A great ratio is two parts regular potting soil mixed with one part perlite or coarse sand. This ensures the roots stay dry and happy.
For containers, that photo of the light gray textured ceramic pot is basically the ideal scenario. It has a drainage hole (I’m assuming, because that’s crucial) and it’s wide enough to hold multiple rosettes. I love using a shallow, wide bowl for this. Succulent roots run horizontally, not deep down, so a typical deep flower pot is overkill. Fill your pot with the gritty mix, make a small indentation with your finger, and gently place the callused rosette on top. Firm it in lightly.
Here are a few things I’ve learned about containers the hard way:
– The pot must have a drainage hole. No exceptions, unless you’re a watering wizard or a succulent surgeon.
– Terracotta is fantastic for beginners because it wicks away excess moisture.
– That cute ceramic cup without a hole? Use it as a cachepot, not a planter.
Watering and Light Needs During the Rooting Phase
This is where most people panic. You’ve planted your rosette, and now you’re staring at it, wondering if it needs a drink. The answer is: not yet. For the first week, just leave it alone. Let the soil stay completely dry. The cutting is using its stored energy to push out roots, and water will only interrupt that process.
After about seven to ten days, give it a gentle watering. You can do the “tug test” to check for roots, if you want. Give the stem a very light pull. If there’s resistance, roots are forming. If it moves… wait another week. Once you see new growth in the center of the rosette, you know you’re officially in the clear.
Indoor plants have different needs in winter versus summer. In January, the light is weak and the days are short, so your new plants will need to be right in a south-facing window. If you don’t have one, a grow light is your best friend. I use a cheap LED clip light, and honestly, the difference is night and day. The rosettes will stay tight and compact, and they’ll develop that beautiful purple blush you’re after.
How to Go From Cuttings to a Full, Clustered Pot
Now, if you want that “TO THIS” look in the bottom panel, you’re not just stopping at one cutting. That cluster of multiple rosettes in the gray ceramic pot is the goal. To achieve that, you need to plant several cuttings together in the same vessel.
When I made my cluster pot, I used three different rosettes of various sizes. I left them in the same pot, spaced about an inch apart. Over the next few months, they grew outward and filled in the gaps. The key is to not overcrowd them at the start. Give them a little breathing room so the air can circulate.
You can also propagate succulents from those individual leaves you pulled off earlier. Lay the leaves flat on top of the soil, and tiny roots will sprout from the leaf nodes. You’ll see little baby rosettes forming at the base of each leaf within a few weeks. It’s a slower process, but it gives you a ton of new plants. That’s how you go from one stem to a pot that looks absolutely luxurious and full.
Provide Proper Care to Keep Those Purple Accents Vibrant
Succulents with purple rosettes are actually showing off their stress colors. That sounds bad, but it’s a good thing. When they get enough bright sunlight and slightly cool temperatures, they release pigments that turn their leaves pink, purple, or lavender. It’s a natural sunscreen.
If you keep your indoor plants in lower light, they’ll revert to a dull green. To get that purple tinge back, you have to give them more sun. Just be careful to introduce them to brighter light gradually. A succulent that’s been sitting in a dim corner all winter will get sunburnt if you suddenly stick it in a blazing hot window. Think of it like a tan, not a burn.
Also, resistant the urge to mist them. Succulents hate wet leaves. They prefer dry air and dry soil. I run a small fan near my plants in the winter just to keep the air moving, which also helps prevent mold and rot. It feels a little extra, but my succulents have never looked better.
A Seasonal Note on Timing (If You’re Trying This in Fall or Winter)
Succulent propagation is often talked about as a summer activity, but I honestly prefer doing it in the winter. Why? Because the air in my house is so dry, the cuttings callus over super fast. The root growth takes a little longer, but the risk of rot is much lower.
If you’re doing this now, keep the heating vents away from your plants. The dry heat will suck the moisture right out of the leaves. Also, don’t fertilize during the winter. The plant is technically resting, and fertilizer will burn the tender new roots. Wait until the days lengthen in March, then feed them with a diluted cactus fertilizer. This is a houseplant care tip that took me way too long to learn, trust me.
Anyway, the best part about this specific project is the visual reward. That before and after photo is so satisfying because it shows just how resilient these little plants are. A single tall, awkward stem has all the potential it needs to become a full pot of purple-tinged rosettes. You just have to give it the right conditions.
So, if you have a succulent that’s looking a little leggy today, don’t toss it. Grab your scissors, prepare the propagation station, and get to work. Give it a few weeks, and you’ll have a brand-new pot full of life, perfect for those gray ceramic containers you’ve been eyeing. If you try this out, I’d love to hear how your rosettes turn out. Happy planting, and send me a message if you end up with more cuttings than you know what to do with. That’s the best kind of problem to have.
Leave a Comment