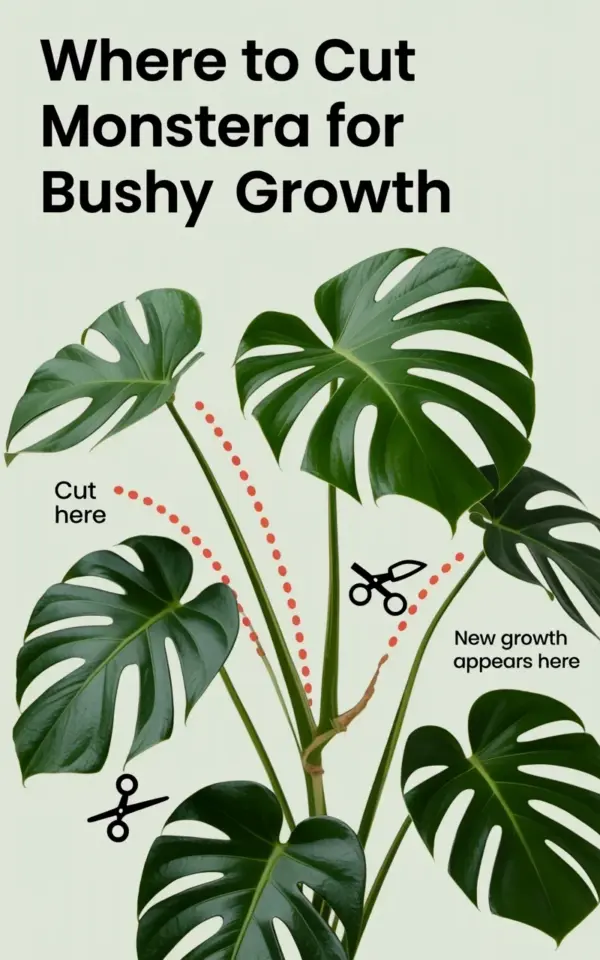
Look, if you want a bushier Monstera without spending money on fancy tools, you are in the right place. I am talking about MonsteraPruning the smart way, using sharp scissors you already own. That photo with the red dotted lines and the black scissors icons? It shows exactly where to cut. “CUT HERE” and “NEW GROWTH APPEARS HERE” are the only instructions you need. Honestly, it is that simple. And the best part? You save cash by turning those cuttings into free plants. Not gonna lie, I have done this in my own tiny apartment on a shoestring budget. Here is the thing: you do not need a special garden center trip. Just your kitchen scissors and this guide.
Where to Cut Monstera for Bushy Growth (The Red Dotted Lines)
The image above is worth a thousand words. It shows a Monstera with five glossy, fenestrated leaves against a light cream background. Black text at the top reads “WHERE TO CUT MONSTERA FOR BUSHY GROWTH”. And then you see it: red dotted lines running across the stem right below a node. Scissors icons mark the spot. That is your target.
Here is the specific location. Find a node (the little bump where a leaf and an aerial root meet the stem). Cut about half an inch above that node. Why above? Because the node holds dormant buds. When you snip the stem above it, you force those buds to wake up and push out new leaves. The “NEW GROWTH APPEARS HERE” callout in the photo points right at that node. Simple.
- Look for a node with an aerial root – that root helps when you propagate.
- Cut just above the node – leave a small stub so you don’t damage the bud.
- Use sharp, clean scissors – a clean cut heals faster than a ragged tear.
One weird thing I learned the hard way: if you cut too close to the node, you risk crushing the bud. Leave a little breathing room. Like a finger width. That is it.
Why Pruning on a Budget Works Better Than You Think
Ok so, BudgetGardening is not about skipping steps. It is about being smart with what you already own. A pair of sharp scissors, a clean rag with rubbing alcohol to sterilize the blades, and maybe a jar of water for the cuttings. That is the entire tool kit. Nothing else.
I have seen people spend fifty bucks on pruning shears with ergonomic handles. For a Monstera? You do not need that. The stems are soft, not woody. Your regular kitchen scissors will do the job perfectly. The only thing to avoid is using dull blades that crush the stem instead of slicing it. But honestly, if your scissors can cut through a cardboard box, they can handle a Monstera stem.
Another budget win: you can skip expensive rooting hormone. Monstera cuttings root in water just fine without it. I have rooted dozens of cuttings in a plain glass jar on my windowsill. No powder, no gel, no extra cost. Save that money for a new pot or a bag of soil.
The Best Season to Prune Your Monstera deliciosa (It Matters)
Timing is everything, and I am not just talking about a random Saturday. IndoorPlantCare has seasons too, even if your plant lives inside. The best window for Monstera pruning is early spring through late summer. That is when the plant is actively growing. Light levels are higher, days are longer, and the plant has energy to push out new growth quickly.
I prune mine in April, right after I start seeing fresh leaves unfurling. But here is the seasonal take: if you live in a northern climate with short winters, do not prune in November or December. The plant is basically resting. Cutting then will leave a bare stem that sits there for months doing nothing. Not a great look.
But what if you missed spring? No worries. A mid-summer trim is fine too. Just avoid deep winter pruning. Unless you have grow lights blasting 14 hours a day, then you can bend the rules a bit. I personally do not have that setup, so I stick with the sunny seasons.
What You Really Need (And What You Absolutely Don’t)
Let me list out the actual supplies. Not the influencer wishlist, but the real stuff. Because HouseplantTips should be practical, not aspirational.
- Sharp scissors – kitchen shears, craft scissors, whatever. Clean them with rubbing alcohol first.
- A bowl or newspaper – to catch any dripping sap. Monstera sap can be sticky and mildly irritating. Not dangerous, just annoying.
- A glass of water – for the cuttings right after you snip them. They start drying out fast.
- That is it. No rooting hormone. No fancy pruning sealant. No special gloves (though I wear them because the sap gives me a rash, but that is a me problem).
One thing I will add: a pair of gloves if you have sensitive skin. I learned that the hard way after an itchy afternoon. But if you are fine with sticky fingers, skip the gloves. See? Budget.
Turning Cuttings into New Plants for Free (Yes, Really)
PruningGuide is not complete without talking about propagation. Every single cutting you take can become a new plant. That is the hidden bonus of pruning for bushiness. You remove a long stem, the mother plant gets fuller, and you get a clone you can gift, trade, or keep.
Here is my method. After you cut just above the node (following those red dotted lines from the photo), place the cutting in a jar of room-temperature water. Submerge the node and the aerial root. Keep the leaf out of the water. Change the water every three to five days. Within a few weeks, you will see white roots growing from the node. Once those roots are about two inches long, you can pot the cutting in soil.
I have propagated cuttings in old pickle jars. I have used mason jars. I have even used a plastic cup. The container does not matter. What matters is light. Put the jar in bright indirect light, not direct sun. A windowsill with a sheer curtain works great.
One annoying thing: sometimes the cutting will grow algae in the water if you leave it too long. Not a big deal. Just rinse the jar and swap the water. Or use a dark glass jar to block light. That helps. Anyway, the point is free plants. You spend nothing but a little patience.
Common Monstera Pruning Mistakes to Skip (Learn From My Failures)
I have made every mistake in the book. HouseplantTips are often learned through failure, not success. So let me save you the trouble.
- Cutting too many leaves at once. Do not prune more than a third of the plant in one go. It shocks the plant. I once chopped half my Monstera and it sulked for months.
- Cutting without a node. If you cut a stem with no node, that piece will never grow roots. It just rots. Check for that brown bump.
- Using dull scissors. I tried to use old office scissors once. They mangled the stem. The cut healed slowly and the plant got a bit of die-back. Not worth it. Just use sharp ones.
- Forgetting to sterilize. A dirty blade can transfer bacteria. Wipe with alcohol or even a dab of hand sanitizer. Takes five seconds.
- Pruning when the plant is thirsty. Give your Monstera a good drink a day before you cut. A hydrated stem cuts cleaner and recovers faster.
Honestly, the biggest mistake is overthinking it. You see those red dotted lines in the photo? You can literally match them to your plant. Cut there. New growth appears there. It is not rocket science. It is a plant that wants to grow. You just have to give it the right nudge.
Final Thoughts (With a Soft Nudge)
That is the whole deal. Prune your Monstera above a node, use scissors you already own, and propagate the clippings for free. The photo with the dotted lines and scissors icons is your cheat sheet. Save it. Pin it. Stick it on your fridge. Every time you look at your leggy plant, you will know exactly what to do.
And hey, if you try this and get new growth within a few weeks, come back and tell me how it went. I love hearing those stories. Happy pruning, and keep those scissors sharp.
#MonsteraPruning #BudgetGardening #HouseplantTips #IndoorPlantCare #PruningGuide
Leave a Comment