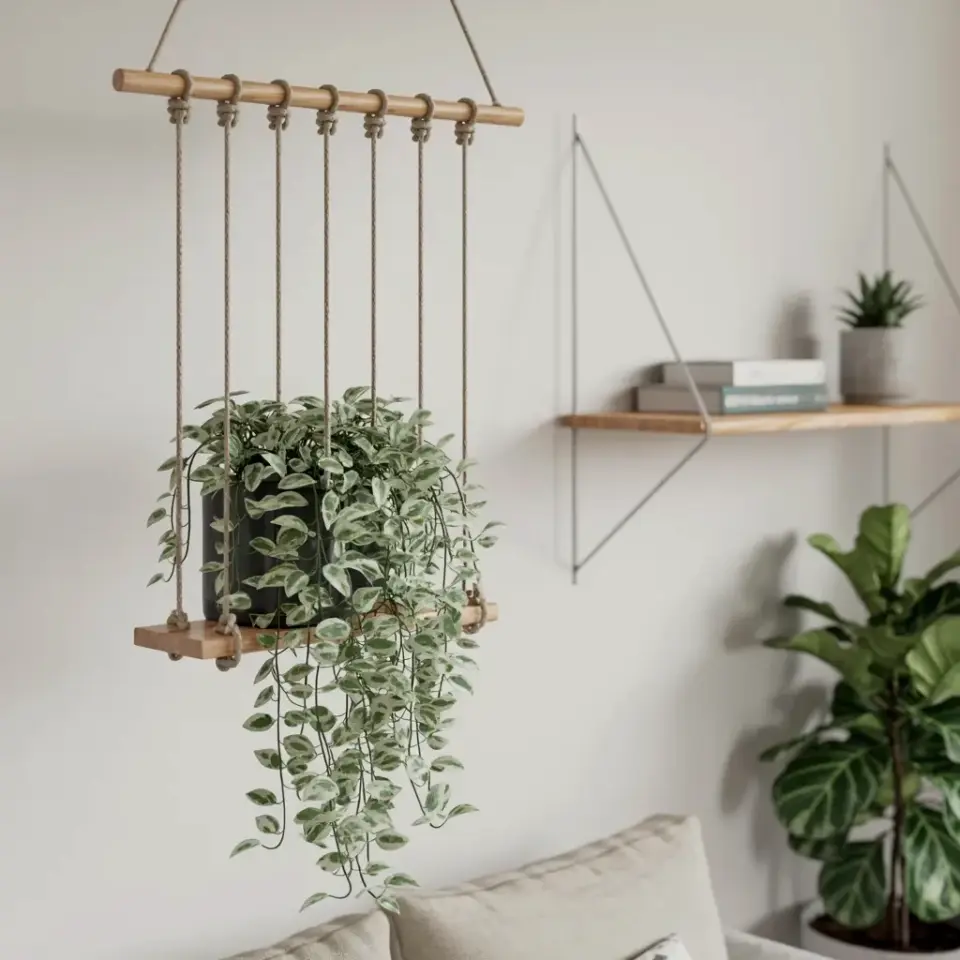
A variegated pothos with those silvery green splashes is already a showstopper on a shelf, but the moment you lift it up off the furniture, something changes. The vines get room to breathe, the light hits the leaves from a new angle, and suddenly your living room looks like it was styled for a magazine shoot. I spent a rainy Saturday morning staring at my plant corner, bored with the same old setup, and decided to try something with a wooden bar and some rope I had stashed in a drawer.
The result? A hanging pothos plant that took me ten minutes to put together, and honestly, zero drills were involved.
There are a hundred plant hangers you can buy, and most of them look like macrame gone wrong or plastic that belongs in a dorm room. The rope and bar trick is different. It has a warm, natural texture that plays beautifully against a crisp white wall, and it costs almost nothing if you already have basic supplies. Plus, you get to tell people you made it, and you can make it look exactly the way you want.
Let me walk you through the whole process, including the little mistakes I made so you don’t have to make them yourself.
Gather Your Supplies for a DIY Plant Hanger
Before you do anything else, raid your craft bin or take a quick trip to the hardware store. Look, you don’t need fancy equipment for this. The entire project rests on a few simple items, and you probably own most of them already.
The stars of the show are a wooden bar and some natural jute rope. I used a plain dowel that was originally meant for a curtain rod, and it worked perfectly. Just make sure the wood is smooth so it doesn’t snag on the rope fibers or scratch your wall.
– A wooden bar or dowel (about 12 to 18 inches long, depending on your pot size)
– Natural jute rope (I used five separate lengths, roughly four feet each)
– A plastic or ceramic pot with drainage
– Command hooks (the ones rated for heavier weight)
– Scissors or a sharp knife
That is genuinely the entire list. If you have a particularly heavy ceramic pot, grab a thicker rope or double up the strands. The jute is strong, but the knot where it wraps around the pot rim is what carries most of the weight, so don’t skimp on the tie.
Why a Wooden Bar and Rope Beat Traditional Hangers
I have bought so many hanging planters over the years, and most of them have one annoying flaw: they swing. A single point hanger, like a hook in the ceiling, turns your pothos into a pendulum every time someone walks past or a window is opened.
The wooden bar solves that problem because it spreads the weight horizontally. The plant hangs level, the bar stays stable against the wall, and the vines cascade down in a straight, vertical line that looks deliberate and elegant.
Another thing I love about this bar setup is how it shows off the plant itself. The natural jute and wood are neutral, so they recede into the background and let the chartreuse and silver foliage take center stage. You do not need a fancy ceramic pot for this to work, either. I used a basic nursery pot inside a slightly nicer cover, and it looked completely intentional.
How to Secure the Rope to the Bar and Pot
Ok so the mechanics of this are simpler than you might think. You are essentially creating a cradle for the pot out of rope, and then attaching that cradle to the bar.
Start by cutting your five pieces of jute rope to the same length. I wanted the bar to sit about a foot above the pot rim, so I cut the ropes longer than I thought I needed. You can always trim them, but you cannot uncut them, so err on the side of caution.
Take four of the ropes and find the center of each one. Drape them over the wooden bar so the centers rest on top, and let the ends hang down on either side. Then take the fifth rope and tie it in a simple knot around the entire bundle at the center point, just to keep everything aligned. Now group the eight dangling ends together and pull them through the bottom of your plant pot. Slip the ropes around the rim of the pot, making sure the pot sits evenly, and tie a secure knot or loop under the lip.
I know that is not a fancy macrame knot, but you know what? It works.
Mounting the Bar on a White Wall With No Drills
Here is the part that makes this project so appealing to renters and to people who just hate getting out the power tools. You are not going to put a single hole in that wall.
I mounted mine with two heavy-duty Command hooks placed horizontally. I measured the distance between the ends of the wooden bar and stuck the hooks right at those points. Before you stick them on, clean the wall with a bit of rubbing alcohol and let it dry fully. That tiny step makes a huge difference in how well they stay put.
Press the hooks firmly against the wall for about thirty seconds each. Then, and this is a trick I learned the hard way, wait a full hour before you hang anything on them. Give the adhesive time to set. If you hang your pothos immediately, you risk waking up to a crash in the middle of the night.
The white wall in the photo makes the natural rope and wood pop so nicely. If your walls are a stronger color, that is fine, but the contrast might be a little less dramatic.
Balancing Your Pothos to Prevent That Annoying Tilt
The first time I did this, my pot tilted to one side almost immediately. It looked crooked, and the vines bunched up on one side of the bar like they were all trying to escape.
The trick is distribution. You need five ropes, not four, and you need to space them evenly around the pot rim. I bunched all my rope ends together on one side initially, and the whole display leaned horribly.
Center the pot under the bar first. Then adjust the rope knots so the weight is spread evenly across the top of the bar. Give the pot a gentle spin and see if it hangs level. Making small adjustments to the rope ties takes less than a minute and will save you a ton of frustration.
Also, consider the plant itself. If your pothos is heavily weighted on one side because of a particular long vine, rotate the pot occasionally to keep the growth balanced.
Styling Tips for Your New Vertical Display
Once the pothos is up on the wall, you are going to want to look at it from across the room and just enjoy the vibe. It is a stunning look.
For the best visual impact, hang it at eye level or slightly above. In the photo, you can see a floating wooden shelf positioned near the hanging plant, holding a couple of stacked books and a small potted succulent. That shelf is a lovely addition because it breaks up the vertical line and gives the eye somewhere to rest. If you have a fiddle leaf fig sitting nearby on the floor, the mix of heights and leaf textures makes the whole corner feel established and layered.
I have a confession to make about the setup in the photo. That floating shelf was not originally there. I rearranged my furniture about five times before I decided the shelf created a better frame for the hanging pothos. Do not be afraid to move things around. The way a plant interacts with its surroundings changes everything.
One small tip that makes a world of difference: give the vines a gentle misting before you take photos or have people over. The water beads on the silver flecks of the pothos leaves and makes them look almost iridescent. It is a dry atmosphere in most homes, so the misting is good for the plant, too.
Conclusion
If you have been staring at a pothos sitting on a boring shelf and wishing it had a bit more drama, this is your weekend project. It involves a wooden bar, some jute rope, and five minutes of fiddling around with knots. There are no drills to worry about, no complicated patterns to follow, and no expensive hooks to buy. Just pure, simple greenery hanging right where you can see it.
Go ahead and give it a try. Your pothos will thank you, and so will your wall.
Leave a Comment