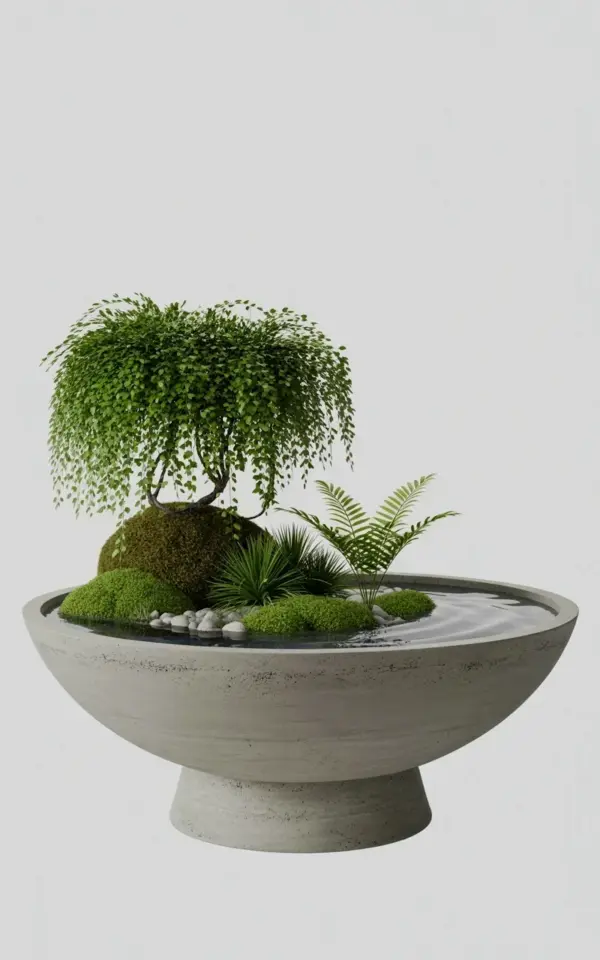
There’s something about a shallow pool of water inside a concrete bowl that makes a room feel quieter. That’s exactly what this zen garden terrarium in a concrete bowl captures: a small landscape with a weeping willow cascading over a moss mound, ferns tucked in below, and still water reflecting the leaves above. It looks like a piece of a Japanese garden got shrunk down and placed on a pedestal, and the best part is, you can build this on a random Saturday afternoon.
I’m not a professional landscaper, just someone who kills houseplants with love and overwatering, so trust me when I say this project is forgiving. The concrete planter holds moisture, the shallow water layer keeps humidity high, and the whole thing becomes a tiny self-contained ecosystem. You don’t need a green thumb. You need about two hours, a trip to a plant store, and maybe a towel for the inevitable spill.
Ok so let’s get into the actual building process, because there’s a right order to stack things, and a wrong order that ends with muddy water and floating bark.
Why a Concrete Bowl Works Better Than Glass for This
Glass terrariums are gorgeous, but they’re also a pain to clean and easy to break. A concrete planter, on the other hand, feels solid and grounded. It also breathes, which means excess moisture has a better chance to evaporate through the porous walls instead of pooling at the bottom and rotting roots.
The curved bowl shown in the reference photo sits on a matching concrete pedestal, and that pedestal is doing more than just looking stylish. It raises the terrarium to eye level so you actually see the layers, the water, the moss, the tiny ferns. If you’re buying a bowl separately, get one without drainage holes for this project. You want that water layer to stay, not drain away.
Honestly, any wide, shallow container works, but concrete has this slight industrial edge that makes the greenery pop. It feels modern and old at the same time, like something from a minimalist hotel lobby but with more personality.
The Right Plants for a Zen Garden Terrarium
You’re not planting a jungle here. You’re building a landscape, so choose plants that respect the scale and don’t go crazy in humid conditions. Here’s what worked for the setup in the photo and what I’d recommend:
– Weeping willow: yes, you can grow a bonsai-style willow indoors. Look for a small one or a cutting that’s already trained. The cascading foliage gives that “ancient tree” look.
– Ferns: small varieties like maidenhair or button ferns fit perfectly in the lower areas. They love the moisture.
– Moss: either sheet moss or cushion moss. This is the carpet that ties the whole thing together.
– Maybe a small pebble or two as accent stones, but don’t overdo it.
Here’s the thing about the weeping willow: it’s thirsty. It’ll drink up that shallow water layer faster than you expect. That’s fine, actually, because the water keeps the humidity high and the fern roots happy. Just keep the willow trimmed so it doesn’t outgrow the bowl and start looking like a houseplant that’s trying to escape.
How to Layer Your Terrarium for Drainage and Depth
Start with a clean concrete bowl, then build a slope, not a flat bed. The photo shows multiple levels, and that’s what makes the arrangement feel natural. So here’s the process.
First, pour in a thin layer of fine gravel or small pebbles. This isn’t for drainage in the traditional sense, it’s more to give the substrate a stable base and keep the water clear. Add just enough water to cover the pebbles, maybe a quarter inch deep. That’s your shallow water layer. It reflects the plants above and keeps the bottom of the bowl from looking dead and dry.
Next, mix a bit of activated charcoal into the soil. Wait, do you need charcoal? Not strictly, but it keeps the water from smelling like a swamp after a few weeks. Trust me on this one. I skipped it once and my bedroom smelled like a marsh for a month. Then add a layer of tropical soil or a houseplant mix, and mound it higher on one side of the bowl. That raised mound is where the moss ball and willow will sit.
Building the Moss Mound and Positioning the Weeping Willow
Take a handful of moist moss and shape it into a dome. Place it on the higher side of the soil slope. This is the centerpiece, the visual anchor of your zen garden terrarium. Tuck the roots of the weeping willow into that moss mound, or if your willow is already potted, set the whole pot into the mound and cover the rim with extra moss. Nobody’s judging what’s under the moss.
Now comes the satisfying part. Press the ferns into the soil on the lower slopes, maybe one in the front and one tucked behind a small rock. Let the willow’s branches hang down over the moss and toward the water. Adjust everything until it looks like it grew there naturally, not like you stuck plants into a bowl with a glue gun.
A tip for keeping the moss alive: mist it every few days with filtered water. Tap water leaves white mineral deposits on the leaves, and honestly, that ruins the whole zen aesthetic. Use bottled or rain water if you can.
Water, Light, and the Occasional Trim
This is not a high-maintenance setup. The water level should stay just at the base of the pebbles. Top it off once a week or whenever the willow starts looking a little droopy. In bright, indirect light, the willow will grow fast. That means you’ll need to prune it every couple of weeks to keep the shape. Use small scissors and cut just above a leaf node. The ferns will also drop spores and can get leggy, so pinch off old fronds at the base.
Here’s the weird personal thing I discovered: talking to plants is completely optional, but yelling at the fern when you forget to water it doesn’t help. Move on.
Also, rotate the bowl a quarter turn each week so the willow doesn’t lean toward the window like it’s trying to catch a bus. The moss will stay green if the humidity is right, and if some spots turn brown, just replace those patches with fresh moss.
Seasonal Adjustments for a Thriving Indoor Garden
Since this is a terrarium, it doesn’t experience winter the way an outdoor garden does. But the indoor air changes. In winter, heaters dry everything out, so the moss might get crispy. Mist more often, or place a little dish of water nearby to add moisture to the air.
In summer, you may need to move the bowl out of direct afternoon sun. The water layer can warm up and cook the roots, which is not the kind of peaceful vibe you’re going for. And if you go on vacation, don’t panic. This setup can survive a week on its own as long as the water level is decent when you leave. The willow might look dramatic, but it’ll bounce back.
One more seasonal thought: concrete bowls can develop a slight white efflorescence over time. It’s mineral residue, and it’s actually kind of pretty, but you can wipe it with a damp cloth if it bothers you.
I like that this project changes with the seasons. In spring, the willow throws out fresh pale green leaves. In autumn, it just keeps doing its thing, which is a quiet kind of reliability.
So if you’re getting a little tired of the same old hanging plants and shelf of succulents, try a concrete bowl and a bit of water. It’s a small project with a big presence. Grab a bowl, some moss, a willow cutting, and give yourself a quiet afternoon to build something that doesn’t require a screen or a battery. Your room will feel like a mini retreat, and you’ll have made it yourself, which honestly is the best part.
Leave a Comment