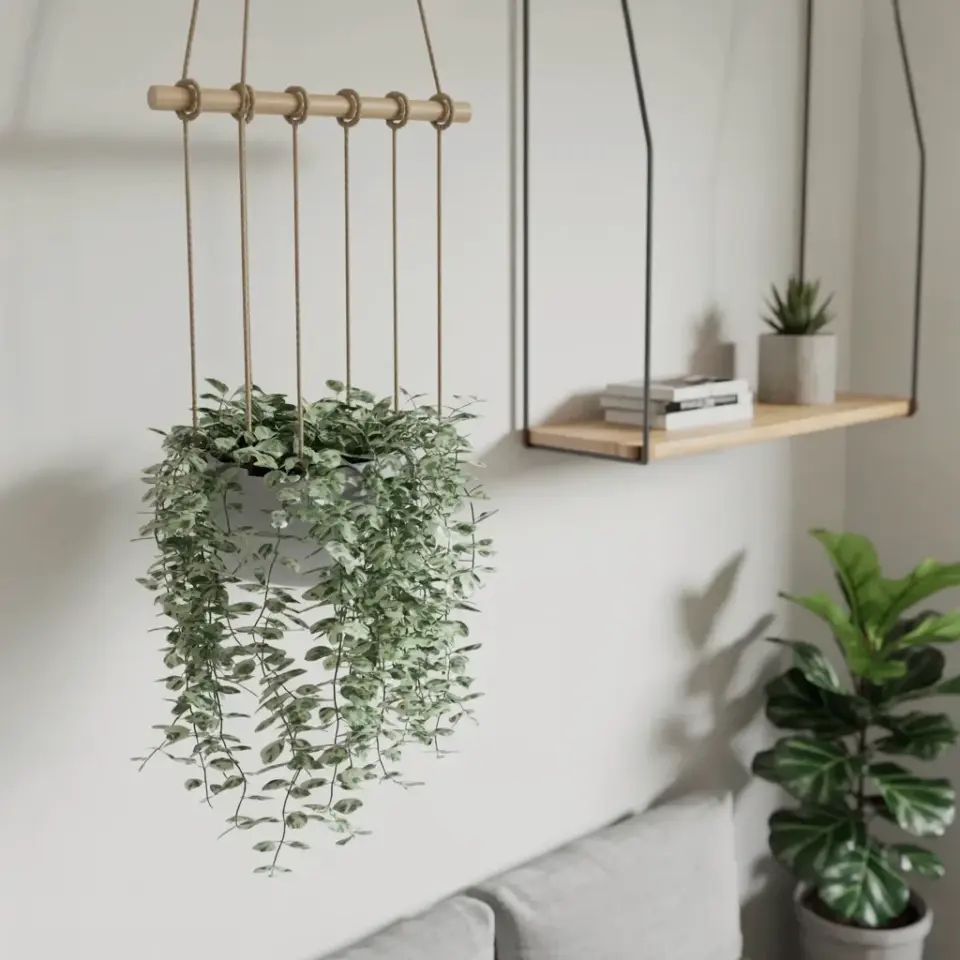
Ok so you’ve seen the photo, right? That white wall, the light wooden bar, and a pothos just tumbling down like it owns the place. That is exactly what we are building today. This hanging plant display DIY with a wooden bar and jute rope is honestly the easiest weekend project I have done in a long time, and it costs next to nothing if you have scrap wood lying around. The full look, including the floating shelf and the little succulent sidekick, takes about an hour to put together. Maybe two if you are slow with a drill like me.
Let me paint the picture for you. Five natural jute ropes hang straight down from a wooden bar, holding a potted variegated pothos. The leaves are that perfect mix of silver, cream, and green, and they trail down about two feet, catching the light. Below it, a floating shelf holds two stacked books and a tiny succulent pot. It is simple, it is clean, and it makes the whole room feel alive. I am honestly obsessed with how the texture of the rope softens the hard lines of the white wall.
## DIY Hanging Plant Display: Choosing the Right Wooden Bar and Jute Rope
Let’s talk materials first because this is where people overthink it. You do not need a heavy oak beam for this. Honestly, a lightweight pine dowel or a piece of scrap wood works perfectly. Look for a bar that is about 18 to 24 inches long and maybe an inch thick. The key here is visual weight, not structural weight. You are only holding one pot, so do not overbuild it. That being said, make sure the wood is dry and sanded smooth so you don’t get splinters in your jute.
For the rope, get natural jute twine that is about 3 to 5 millimeters thick. The thicker rope looks more substantial and gives that rustic, organic vibe that matches the pothos leaves. I used a full roll of jute for my five ropes, and each rope was maybe 36 inches long, folded in half. When you fold it in half and loop it over the bar, you get a nice neat hanger. The photo shows exactly that, clean lines, visible texture, no fuss.
You will also need a drill with a small bit to make pilot holes in the wood. Please do not skip this step. Jute rope is strong, but the knot can slip if the hole is too tight or has rough edges. I learned this the hard way when my plant took a nosedive onto the floor. A little sandpaper and a steady hand will save you from a headache.
## How to Mount a Pothos Hanger on a White Wall Without Damaging the Paint
This is the part everyone worries about, but it is actually the easiest. The bar in the reference photo is mounted close to the wall, maybe an inch out, which creates a nice shadow line. To get that look, you just need two sturdy wall anchors and two screws. Do not mount the bar directly against the wall with no gap, it looks flat and sad. Give it a little breathing room.
Mark your spots on the wall, making sure the bar is level. Use a level. I know you think you can eyeball it, but you cannot. I have seen so many beautiful hanging plant displays ruined by a bar that tilts slightly to the left. Drill your pilot holes, tap in the anchors, and screw the bar in place. If you are renting, use command hooks rated for heavy weight, but honestly, the wooden bar look is so much cleaner with real hardware.
Once the bar is up, loop your folded jute ropes over it. Space them evenly across the bar. The photo shows five ropes, which is a great number because it supports the pot securely without looking like a spider web. Slide the knots to adjust the spacing, and make sure the center rope is exactly in the middle. That is where the plant hangs, and even spacing makes the whole installation feel intentional and calm.
## Styling the Floating Shelf With Books and a Succulent for a Minimalist Look
Alright, the plant is hanging, but the shelf is what really completes the scene. The photo shows a floating wooden shelf mounted to the right of the plant, holding two stacked books and a small potted succulent. The trick here is to keep it minimal. This is not the time to overcrowd the shelf with knick-knacks. You want the eye to travel from the pothos, over to the books, and then down to the succulent, like a little visual journey.
I love using books with neutral or earthy colored spines for this. Tuck one book flat and lean the other against it, or stack them neatly and place the succulent on top. The idea is to create a little moment, not a full display. If you have a small ceramic pot, put the succulent in that. The contrast between the trailing green vines and the small, upright succulent is genuinely pleasing. It’s a whole vibe, as the kids say.
And don’t forget the larger potted fiddle leaf fig partially visible in the background. That big leafy presence adds height and makes the hanging plant look even more intentional. You do not need a fiddle leaf fig specifically, but a taller plant on the floor or a nearby cabinet will ground the whole arrangement. It gives the eye a place to rest after following the pothos all the way down.
## Caring for Your Pothos So the Vines Cascade Long and Full
Here’s the thing about a hanging pothos: it will not look like the photo on day one. You have to let it grow. The variegated pothos in the picture has that beautiful silver and green marbling, which means it needs bright, indirect light to keep those colors popping. Too much direct sun will wash out the leaves, and too little light will make the variegation fade to mostly green. Place your hanger near a window with filtered light, and it will reward you.
Watering is simple. Pothos like to dry out completely between waterings. Stick your finger in the soil; if it is dry up to your first knuckle, water it thoroughly. If it’s still damp, wait a few days. Overwatering is the quickest way to kill these hardy little survivors. I have gone on vacation for two weeks and come back to a perfectly happy pothos, just slightly droopy. They are forgiving, which is why I recommend them to anyone who forgets to water their plants.
To encourage longer vines, you can prune the tips occasionally. Cut just below a leaf node, and the plant will branch out, giving you a fuller, bushier look at the top while the older vines continue to trail. Honestly, the spider plant in my kitchen has gotten more aggressive, but the pothos is the one that gets all the compliments. It has a way of growing gracefully without looking wild.
## How to Adjust the Rope Length for the Perfect Hanging Plant Height
The placement in the photo is spot on. The pothos pot sits just below the bar, and the vines cascade down to about the same height as the floating shelf. This creates a balanced composition that is pleasing to the eye. To get this exact look, you need to play with the rope lengths before you commit. Start long, hang the pot, and then adjust the knots.
The easiest method is to tie a simple slip knot at the top of each rope where it loops over the bar. You can slide these knots to raise or lower the pot. I like to hang the pot so it is about 12 to 18 inches below the bar. This leaves room for the vines to grow down without immediately hitting the floor or a piece of furniture. Leave a little extra rope at the bottom, you can always trim it later.
My advice is to use a lightweight plastic pot with a drainage hole, and then slip it inside a prettier outer pot or a woven basket. The photo shows the plant in a simple pot that doesn’t distract from the leaves. If your outer pot does not have drainage, just take the inner pot out when you water it and put it back. It is a tiny bit of extra work, but it keeps your jute rope from getting water stains and mildew. Trust me, jute rope does not like staying wet.
## Seasonal Styling and Final Thoughts on Your New Plant Display
Here is a fun thought for a seasonal twist, this DIY looks great in every season, but you can change the shelf styling to match. In autumn, swap the books for one with a warm red cover and add a tiny dried flower arrangement. In winter, tuck a small string of fairy lights around the pothos vines for a cozy glow. Spring and summer are perfect for letting the pothos grow wild and long. The structure stays the same, so the seasonal updates are quick and easy.
For a housewarming gift, this hanging plant display DIY is a winner. You can build the whole thing for around twenty to thirty bucks if you buy new materials, but it feels way more expensive. I made one for my sister, and she texted me a photo of it hanging in her dining room within a week. She paired it with a single ceramic vase and it looked even better than mine. Honestly, the hardest part is waiting for the pothos to grow out long enough.
So, grab a wooden bar, some jute rope, and a healthy pothos from your local nursery. Mount it on the wall, style a shelf nearby, and let nature do the rest. Save this trick for your next plant project, and tell me in the comments how long it takes you to find the perfect spot for it. Happy hanging, and keep those vines growing.
Leave a Comment