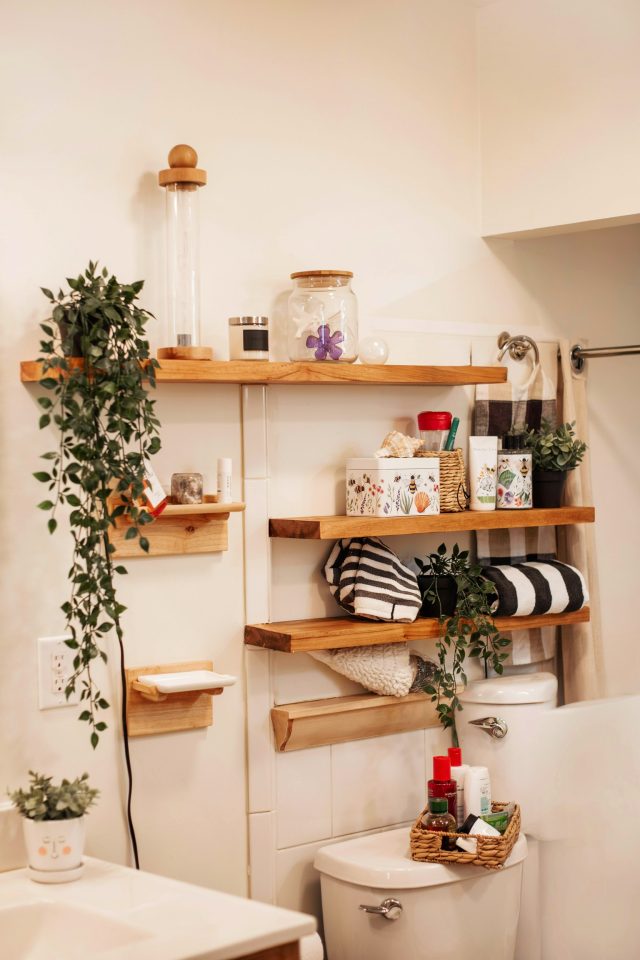
If your bathroom feels cramped and cluttered, you are not alone. Small bathrooms are a common challenge, but the right floating shelves for bathroom decor can transform the space without demanding a full renovation. I have lived in apartments where counter space was a luxury, and adding a few simple shelves made a world of difference. They cost less than a fancy bath mat and free up precious floor room. Today I will show you how to pick, style, and even build your own budget friendly shelves that look like a million bucks but cost only pocket change.
Why Floating Shelves Work for Small Bathroom Storage
Floating shelves are the unsung heroes of small bathroom organization. They take advantage of wall space that would otherwise sit empty, turning unused air into functional storage. In a tiny bathroom, every square inch matters. Shelves let you keep toiletries, towels, and decor off the counter and out of the way.
Unlike bulky cabinets, shelves keep the room feeling open. You see the wall behind them, which tricks the eye into thinking the space is larger. That visual lightness is crucial in a small room where heavy furniture can feel suffocating. Plus, installing a shelf is a one person job that takes less than an hour. You do not need a contractor or a big budget.
I have found that a single shelf above the toilet can hold extra toilet paper rolls, a small plant, and a candle. That simple change freed up the entire under sink cabinet for cleaning supplies. The effect on the room was immediate and noticeable.
Best Materials for Budget Friendly Bathroom Shelves
Bathrooms are humid places, so material matters. You do not have to spend a fortune to get something that lasts. The trick is to choose wisely.
- Solid pine or poplar. These woods are cheap, easy to paint, and hold up well if sealed with a waterproof polyurethane. A 1×8 pine board costs under 10 dollars at the hardware store.
- Reclaimed barn wood. Look on Facebook Marketplace or local salvage yards. One rough plank can be cut into two small shelves for around 15 dollars total. The character is unbeatable.
- Laminated MDF. Pre finished shelf boards from IKEA or Home Depot are about 12 to 20 dollars each. They resist moisture decently as long as water does not sit on them. Wipe them dry after showers.
- Metal and glass combos. Clear glass shelves with simple brackets create an airy look. You can find a set of two for under 25 dollars online. Glass does not warp or stain.
Personally, I avoid raw unfinished particleboard because it swells when wet. A small investment in a can of waterproof sealant (about 8 dollars) can make any wooden shelf last for years.
How to Choose the Right Size and Placement
Size and placement can make or break the look of your shelves. A shelf that is too long will overwhelm a small wall. One that is too short will look lost. For most bathrooms, a shelf between 20 and 36 inches wide works best. Measure the available wall space and then subtract a few inches from each side for visual breathing room.
Place shelves where they are useful but not in the way. Above the toilet is the classic spot, but also consider the space beside the mirror or above the towel rack. If you have a narrow wall next to the shower, a small shelf there can hold shampoo bottles. Do not block light switches or electrical outlets. Hold the shelf up with painter tape before drilling to see how it feels in the room.
I always recommend hanging shelves at eye level or slightly higher. For a standard 8 foot ceiling, aim for about 60 inches from the floor. If you hang two shelves, space them 12 to 16 inches apart so you can fit bottles and small baskets between them.
Five Affordable Decor Pieces to Style Your Shelves
Once the shelves are up, you need to style them without spending much. The goal is to look intentional, not cluttered. I have included real budget options that I have used myself.
- Thrift store glass jars. Clean old pasta sauce jars or buy mason jars at a dollar store. Fill them with cotton balls, q tips, or bath salts. They look clean and cost next to nothing.
- A small trailing plant. Pothos or string of pearls thrive in low light and high humidity. A 4 inch pot costs about 5 dollars at a garden center. Let the vines hang down over the shelf edge for a soft, organic feel.
- One scented candle. Pick a neutral jar like a simple white pillar or a small glass votive. A candle from the grocery store clearance bin for 3 dollars works fine. It adds warmth and a calming scent.
- Stacked washcloths. Roll three matching washcloths and stack them. Choose a color that ties into your bathroom palette. This adds texture and is instantly useful.
- A framed photo or small art print. Dollar stores sell basic frames. Print a black and white photo on regular paper or use an art postcard. Lean it against the wall rather than hanging it. It creates a casual gallery look.
I limit myself to three or four items per shelf. More than that and it starts to look messy. Leave some empty space so the shelf breathes.
DIY Floating Shelves: A Weekend Project Under 30 Dollars
If you are handy with a saw and a drill, building your own shelves is the cheapest route. I built a pair of floating shelves for my own bathroom for about 25 dollars total. Here is the simple method I used.
Start with one 8 foot board of common pine from the lumber aisle. Have the store cut it into two 30 inch pieces. Sand the edges smooth with 120 grit sandpaper. Apply two coats of water based polyurethane, letting each coat dry for a couple hours. While the finish dries, gather your hardware. For floating shelves, you need a drill, a level, wall anchors (if you are not hitting studs), and a bracket system. I used simple L brackets from a hardware store for 2 dollars a pair. They show a little but painted white they blend into the wall.
Mount the brackets securely on the wall studs if possible. If you have drywall, use toggle bolts that hold more weight. Set the shelf on top of the brackets and screw it in from underneath. That hides the screws. Total labor time: about two hours on a Saturday afternoon. The result feels custom and solid, and you saved at least 40 dollars compared to buying ready made shelves.
Where to Buy Cheap Floating Shelves That Look Expensive
Maybe you do not want to build your own. That is fine. There are plenty of affordable ready made options that look like high end decor. I have bought and tested several cheap sets over the years. Here are my favorites based on real shopping.
IKEA Lack shelf. The classic white floating shelf is only 8 dollars and comes in a 43 inch length. It is hollow inside but surprisingly sturdy for lightweight items. Paint the front edge with a color to make it custom. Amazon budget options. Search for “rustic floating shelves” and you will find two packs for around 15 dollars. Read reviews carefully. I look for ones that say “solid wood” and avoid those with “MDF” if possible. Many have hidden brackets that make the shelf look truly floating.
HomeGoods and TJ Maxx. These stores often have single floating shelves in the home section for 10 to 12 dollars. They are usually real wood with a painted finish. The selection changes constantly, so check back every few weeks. Thrift stores and garage sales. People often sell leftover shelf boards for 1 or 2 dollars. You can paint them to match your bathroom. I once found a set of three matching shelves for 5 dollars at a charity shop. A quick coat of matte black spray paint made them look brand new.
Common Mistakes to Avoid When Installing Floating Shelves
Even cheap shelves can look professional if you avoid a few simple errors. I have made most of these myself and learned the hard way.
- Skipping the level. A tilted shelf looks sloppy and can cause items to slide off. Use a small bubble level. Check it in both directions because the floor might be uneven.
- Not finding a stud. If you hang a shelf only on drywall anchors, it might pull out after a few months. Always try to hit at least one stud. Use a stud finder, or tap the wall and listen for a solid sound.
- Overloading with heavy items. Floating shelves have weight limits. A glass shelf might hold 10 pounds, while a solid pine shelf on brackets can hold 30. Do not stack heavy bottles if you are unsure. Test with a small amount of weight first.
- Forgetting to seal wood. In a damp bathroom, unsealed wood will warp and crack. Spend the 8 dollars on a bottle of clear polyurethane. Two coats will protect your shelf for years.
- Placing shelves too close to the shower. Direct water spray will damage any material eventually. Keep shelves at least two feet away from the shower head unless you use tile or glass.
Take your time measuring and leveling. A little extra care during installation saves you from having to patch holes and start over.
Conclusion
Floating shelves for bathroom decor are one of the simplest upgrades you can make on a small budget. They open up floor space, add personality, and keep your daily essentials within easy reach. Whether you build your own from a pine board or pick up a cheap set from a discount store, the key is to choose materials that handle moisture, install them carefully, and style them with just a few meaningful pieces. You do not need a lot of money to make your bathroom feel bigger and more organized. Start with one shelf and see how it changes your morning routine.
Once you have your shelves up, I would love to hear how it goes. Drop a comment below or tag a photo on social media. Sometimes the smallest changes bring the biggest relief in a cramped space.
#bathroomshelves #floatingshelves #smallbathroom #bathroomdecor #bathroomstorage
Leave a Comment